
Welcome, from sunny Australia!
My AE-86 Corolla Page
The Altezza
3SGE conversion detailed
My AE-86 Corolla Page
The Altezza
3SGE conversion detailed
2-7-2003
The conversion has begun!
| Out came the low-kilometre 4AGE, and it's now waiting to go into the Starlet. Here you can see the NEVO under-drive pulleys quite clearly, and the 4AGZE crank angle sensor. |
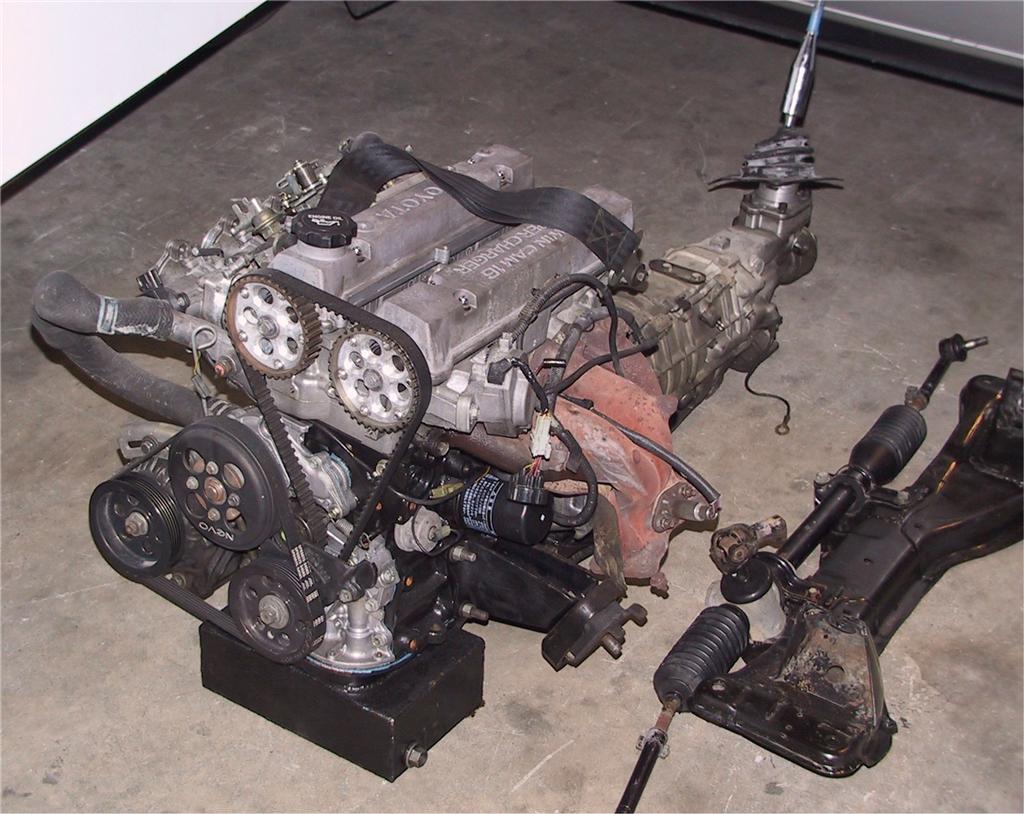 |
| Here is the 200hp Altezza 3SGE sitting it it's stand whilst being modified to go into the AE-86 engine bay. | 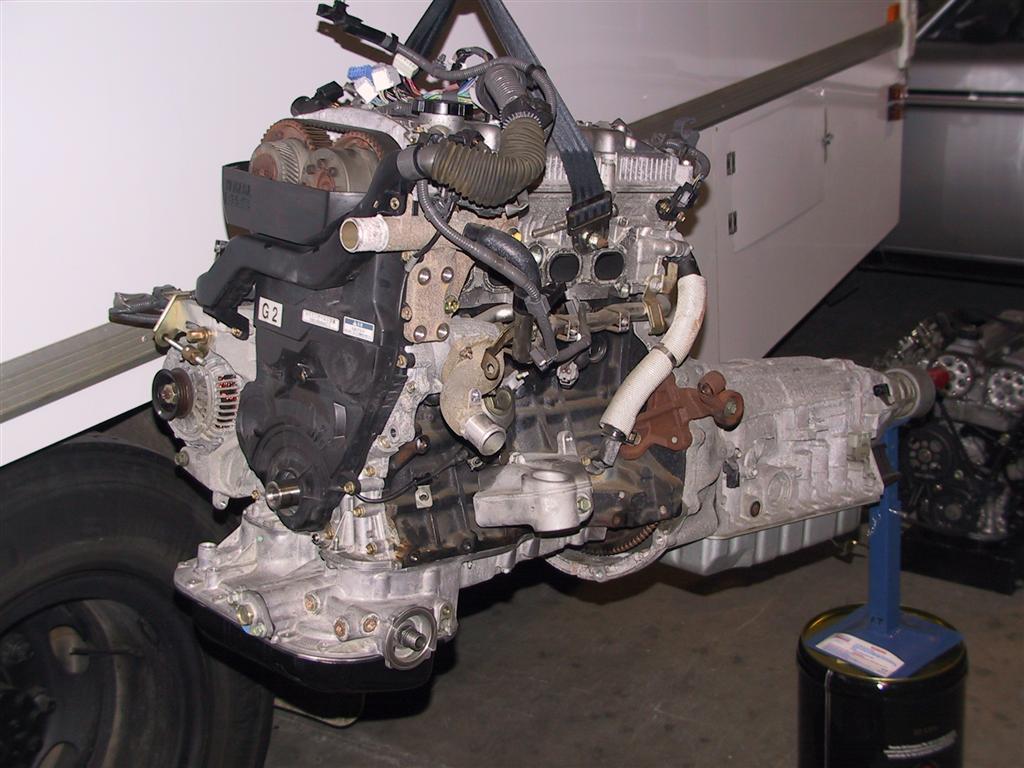 |
| To clear the AE-86 steering rack & mounts, the rear of the 3SGE sump had to be modified a fair bit, by removing a lot of webbing. This lets the engine sit down in the engine bay, with the bonus of being able to shut the bonnet. The downside is that so much alloy had to be removed that the flywheel is exposed and will have to be covered up with a small piece of fabricated sheet steel to stop rocks & debris getting in. | 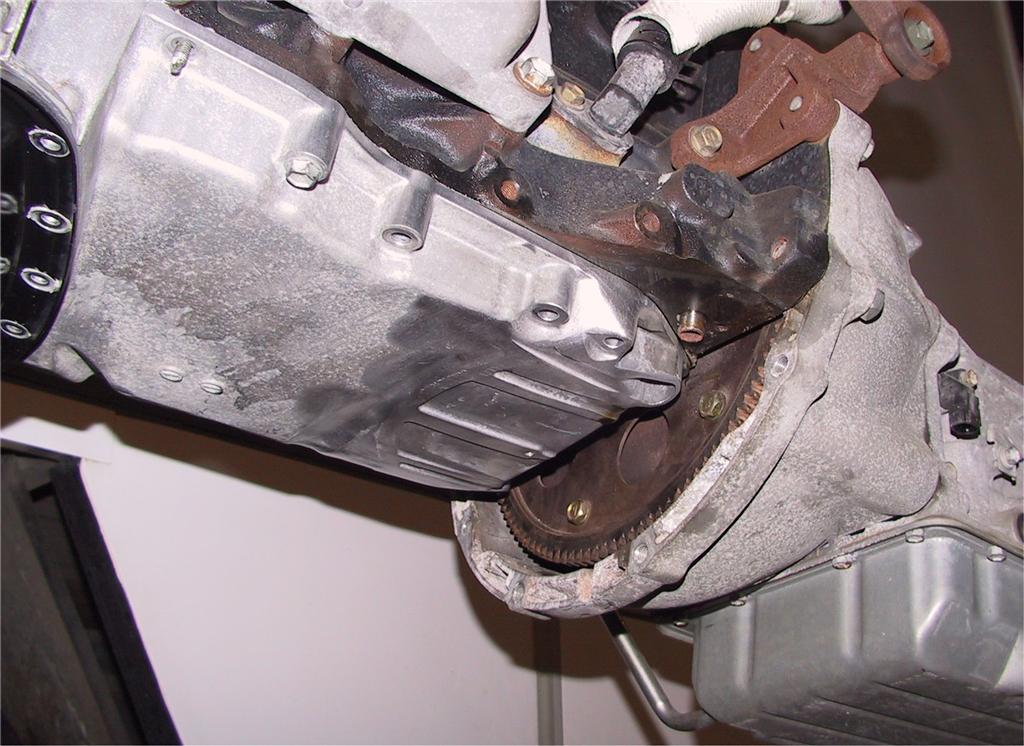 |
| This is a better picture of the 5-speed 'tiptronic' type automatic gearbox. It's perhaps the easiest part of the conversion as it fits into the AE-86 gearbox tunnel without a lot of modification and the gear selector can be placed anywhere because it connects to the gearbox through that long rod hanging off the right hand side of the box. It's a bit hard to see in this picture, but the starter motor is very small for a two litre engine. |  |
| Due to the size of the 3SGE Altezza inlet manifold, there's not a lot of space around the brake vacuum booster. We're still not sure yet, but one probable solution is to fit the car with a twin master cylinder pedal box assembly. I bought one in the UK a couple of years ago on the chance that I might use it one day, and so that day may have come. It's also got an adjustable balance-bar, so I can alter the brake balance as I need to, to get the brakes just how I like them. We are also thinking about fitting the ABS anti-lock braking system from the Altezza into the Sprinter, but this may prove too difficult in the short term. | 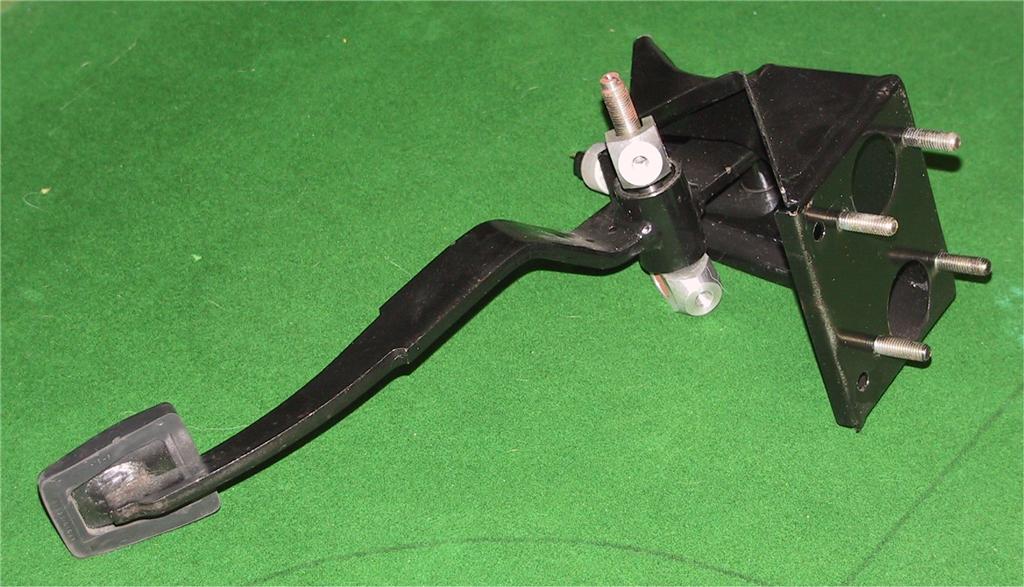 |
10-7-2003
More progress, and more problems squeezing the big engine into the engine bay. More than what we thought anyway ...
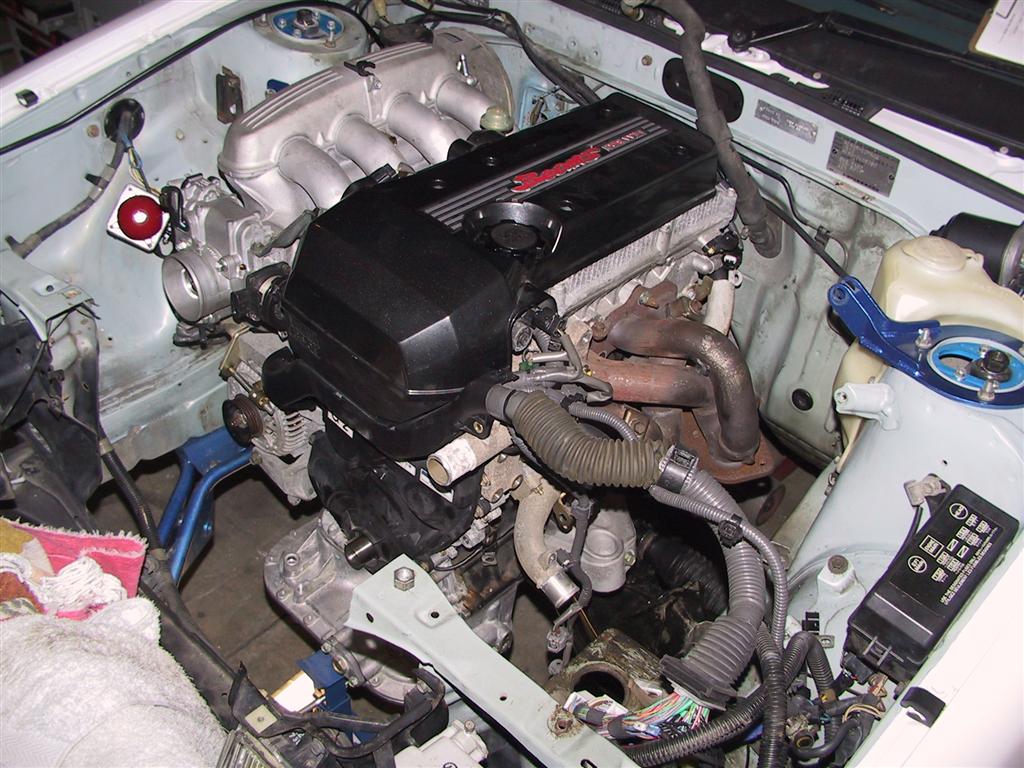 |
This
is something like what the engine will look like when it's in &
finished in the engine bay. At the moment there's a lot of stuff
missing
as they have yet to be added. I guess the main feature of this
picture is the large black plastic cam cover, which unfortunately
also raises the height of the engine even more.
|
 |
This
shows roughly how high the engine sits in the engine bay, and without
a bit of effort it's not possible to shut the bonnet with the black
plastic cam cover on. We will be doing some small mods to the sump,
steering rack, and crossmember to allow the engine to sit further
down in the bay, thus solving the problem. I'd really
like to get the strut brace back on!
|
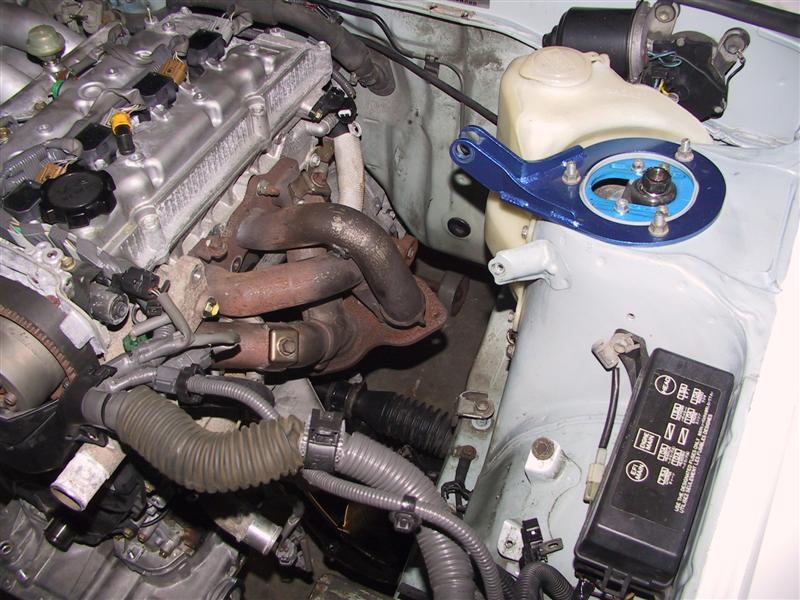 |
The
exhaust should be quite easy to do, as there's nothing in the way. The
Altezza has a small catalytic converter on each of the two secondary
pipes, and they should fit in without too much trouble. The factory
Altezza exhaust manifold is very good indeed and so will be left
standard.
|
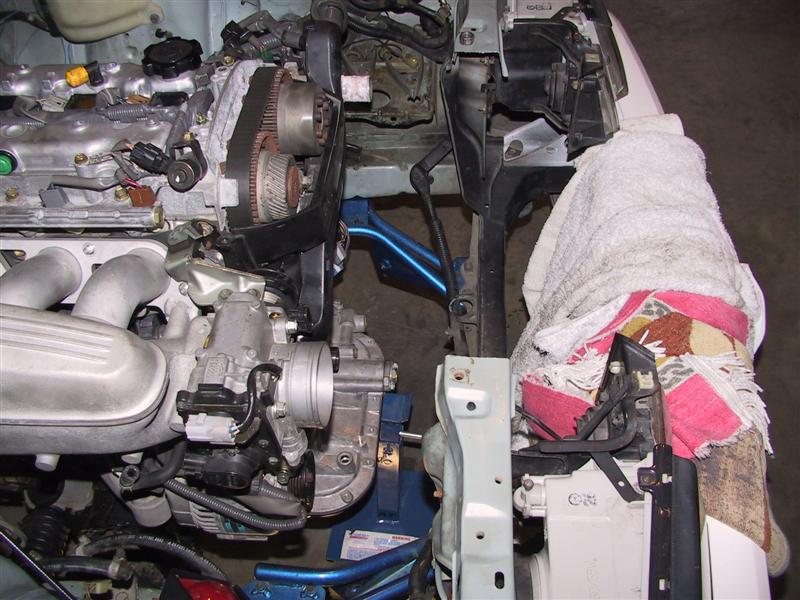 |
The engine isn't quite in it's final place in this photo, but it's close. As you can see there's not a lot of space in front of the engine, and because of this and the need to fit large electric radiator fans to the back of the radiator we'll have to move the radiator forwards a bit. Also note that to physically get the engine & gearbox in & out of the car we had to cut the radiator support panel out, and it will be repaired later by making it fit in place with bolts, so still removable. There's also not a lot of space in front of the throttle body, though there's enough for a 90° bend, and that will go down to the hot-wire airflow sensor & air cleaner. |
 |
In
this photo it can be clearly seen that the standard AE-86 vacuum
booster
& master cylinder brakes are not going to
fit with the Altezza engine! There's just not enough room there, so as
I wrote further up the page the factory brake assembly will be
removed and the twin master cylinder system fitted. Even so,
extra-short 75mm long master cylinders will be fitted to make
sure there's enough space.
|
 |
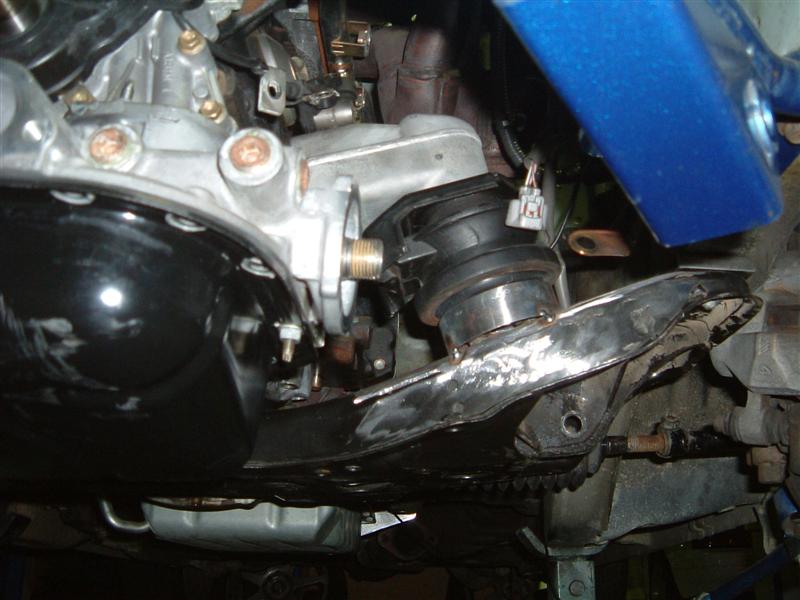
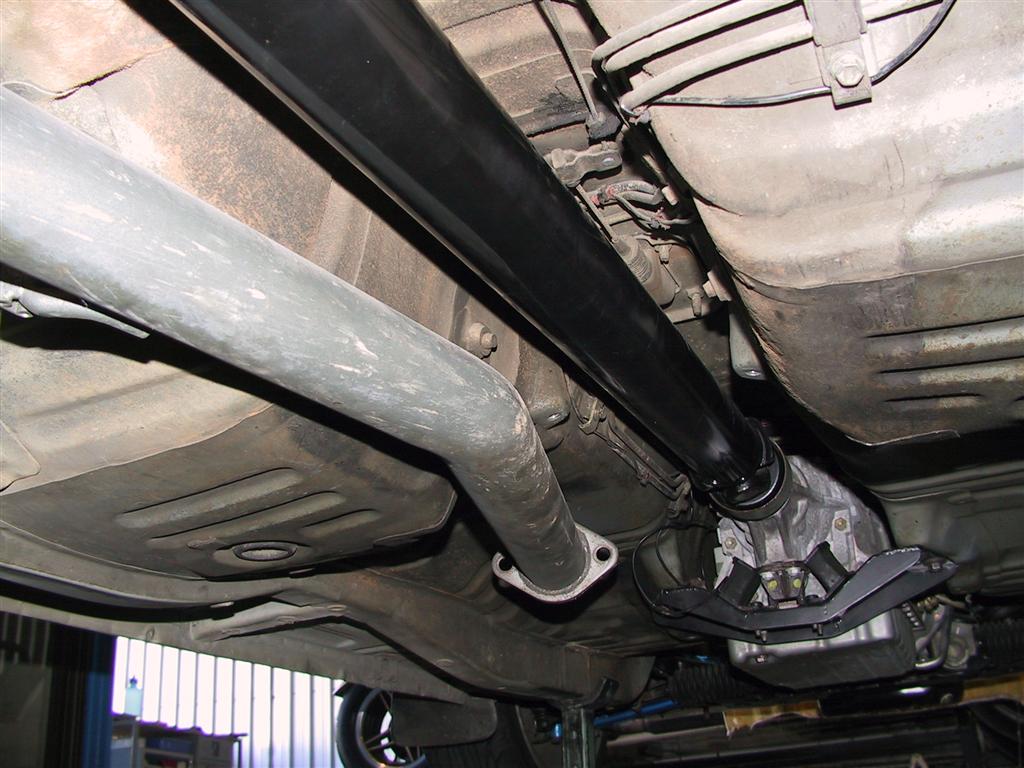
Here
is a good view of the problem of the steering rack & sump. Even
though a large chunk of the rear of the sump has been removed, it still
rubs firmly on the top of the right-hand steering rack mount. We
are going to make a small 'dent' in the alloy sump (some cutting
& MIG welding is in order) and also machine down the top of
the rack mount a small amount. It's also likely we'll lower the
entire crossmember about 15mm - 20mm to give us more space up
top as well. Not quite as clear in the photo is that the steering
knuckle is almost rubbing on a bit of block webbing that runs from a
bolt to the block. The web will have to be shaved a little as
well to make sure the steering knuckle stays well clear.
|
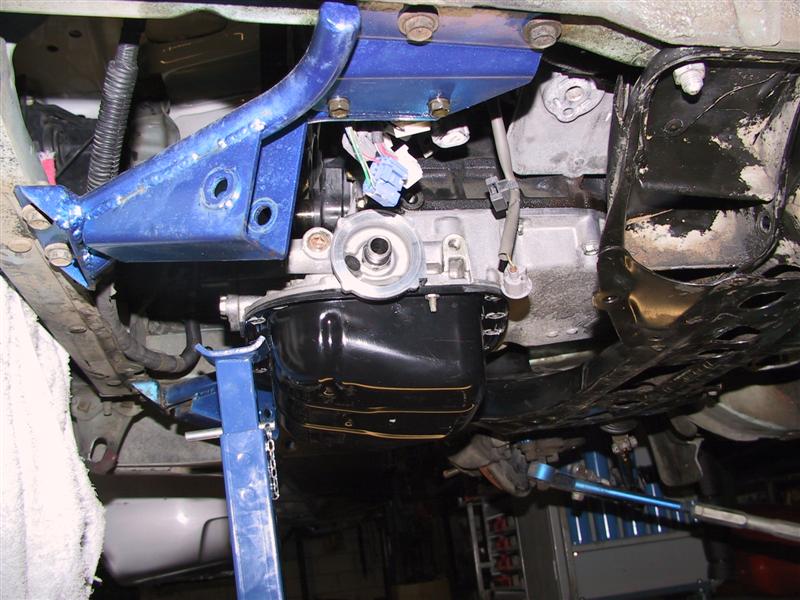 |
This
is the easy end! With the front of the sump there's nothing at all in
the way, so nothing to worry about. It's even easier to get to
the oil filter than on the factory
4AGE, so that's a plus. That being said, we may well have
to fabricate a new lower sump as it looks like the
factory Altezza one is too low, and so hit on speed bumps
& so on.
|
 |
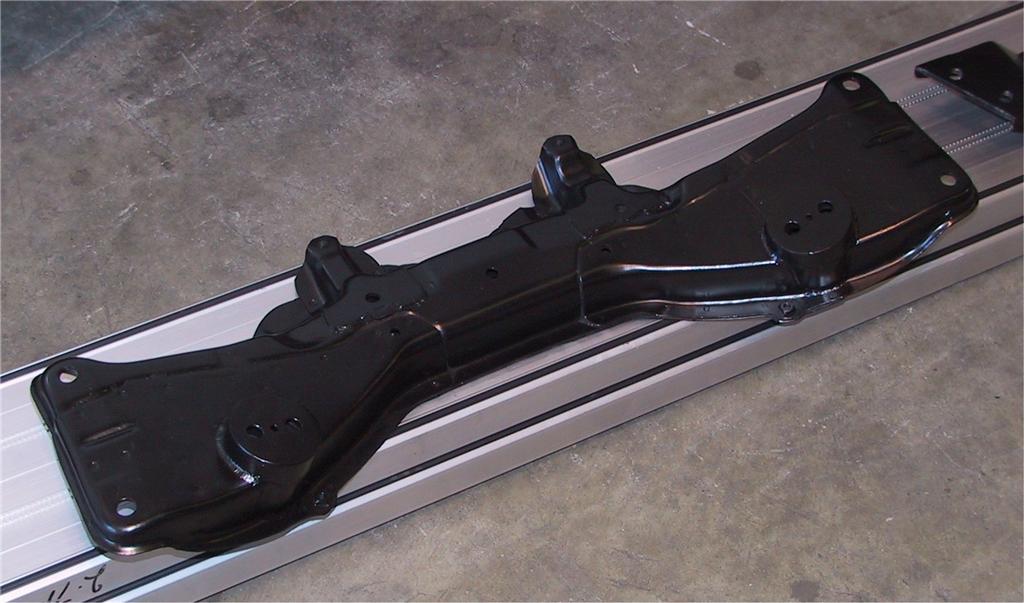
The
engine mounts are finally
done. The factory Altezza mounts on the block were kept, and so the
crossmember was modified to take the rubber buffers. The end result can
be seen on the right and the incomplete fabricated mount on the left. Not all that hard to do, though the crossmember needed a couple of small spacers to move the engine down about 10mm so it clears the underside of the bonnet. |
 |
 |
The
gearbox is a tight fit into the AE-86
gearbox tunnel, but fortunately it all fitted in okay without
having to cut the tunnel at all. The sump on the gearbox is a little
lower that we'd like, but there's not a lot that can be done about it
so I'll just have to be careful over bumps & so on. Hanging
down
from the right-hand-side of the picture is the old mechanical speedo
drive, which will be removed as the car is getting the factory Altezza
instrument panel and they use an electrical signal from the gearbox
alone. |
 |
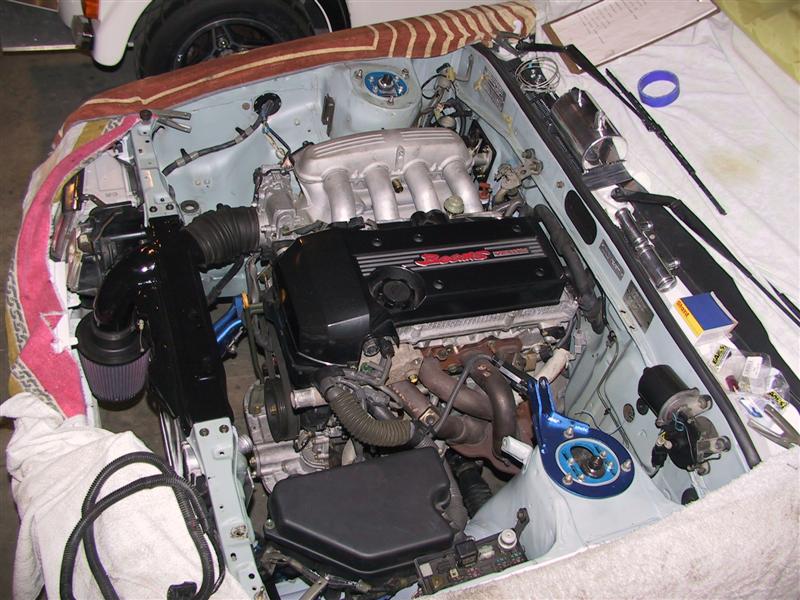
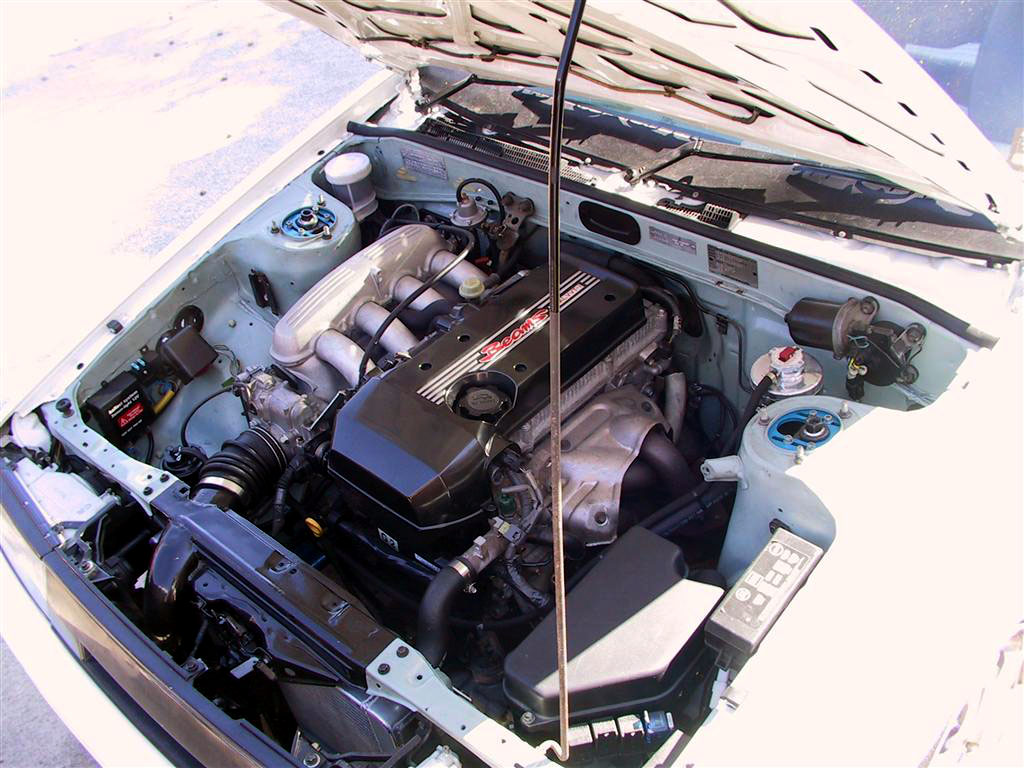
These two
pictures show the engine
sitting in its final place in the engine bay. It's as far back
&
down as we can get it, without making major modifications to the
crossmember & sump. We settled on using the twin cylinder brake
pedal box, as it was really the only way to get enough room on the
inlet side. The radiator is an Aussie-made Paul Wheel Radiators type
and should be very efficient. The 3SGE computer sits in the black box
at the front-left of the engine bay instead of inside the car as most
cars do. We haven't had a chance to try it yet, but it looks like the strut brace between the two strut towers won't go over the engine any more, so in the fullness of time we'll make one that goes from the towers to the middle of the firewall. |
 |
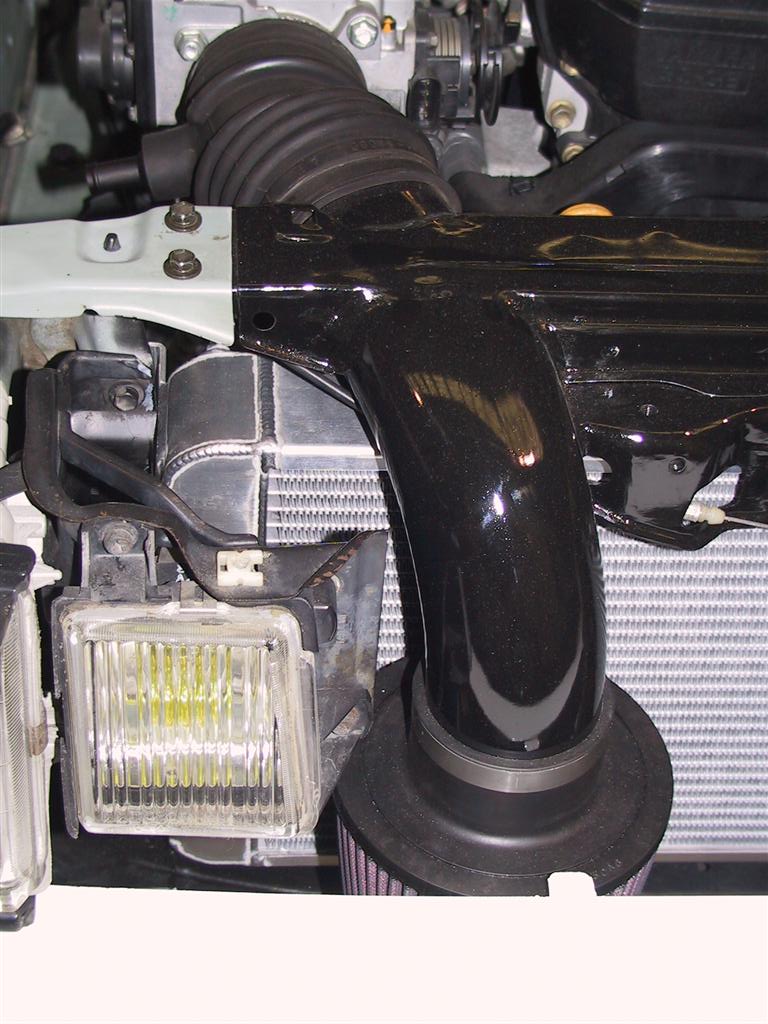 |
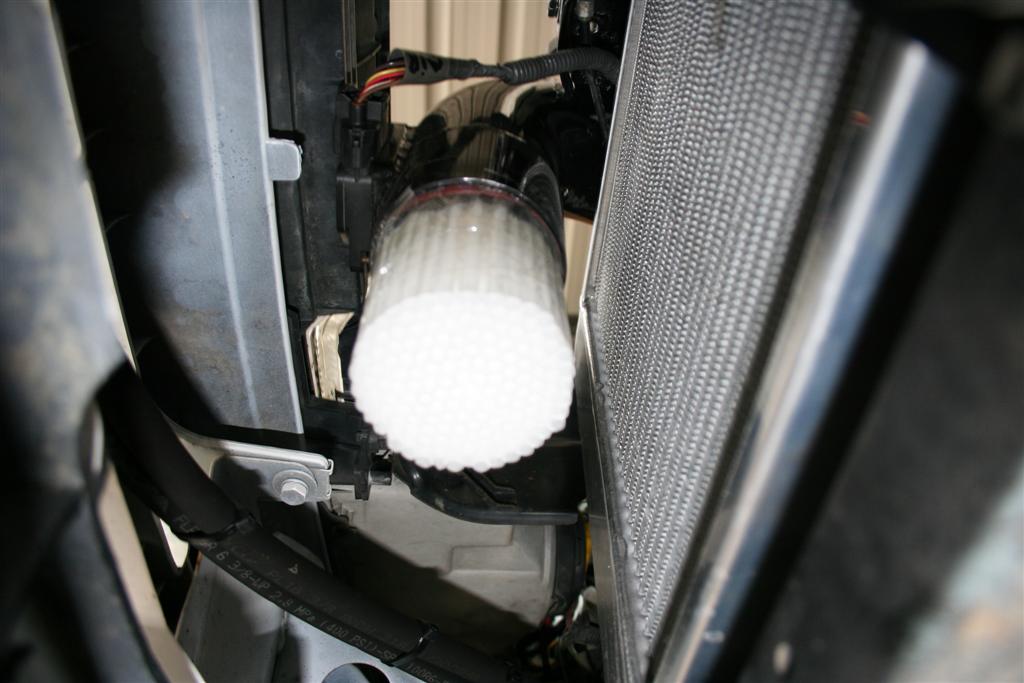
Yet
another of the problems to be solved
was how to get an air filter onto the engine! There's not a
lot of space in front of the throttle body and after a lot of options
were discussed the engineer decided to add a flattened pipe going right
through the radiator support panel, which then goes down 90° to
the
pod filter. A rubber pipe to connect the throttle body and inlet pipe
was found at the wrecker that suited the alignment of the two holes
perfectly. The superb radiator can be seen more clearly here, too. Also, you can see how the radiator support panel is now removable, to make it possible to get the engine in & out - too hard otherwise. |
Late November 2003
 |
The
brakes are all
done, with the twin master cylinder pedal box fitted and our best guess
at the right size cylinders. |
 |
July 2004
 |
Not a great deal has
been done,
but the car now drives. The engine bay is done, with basically the only
thing left to do is get it repainted and that will be done when the car
eventually get a full re-spray at some point. The end result is that it almost looks like a factory job which is what I wanted. If you looks carefully you can also see the HID headlight transformers, installed at the same time. The standard AE-86 headlights are dangerously bad, these are pretty darn good now. I haven't run any performance tests on it yet but it feels reasonably quick, certainly more than enough for an every day car. |
 |
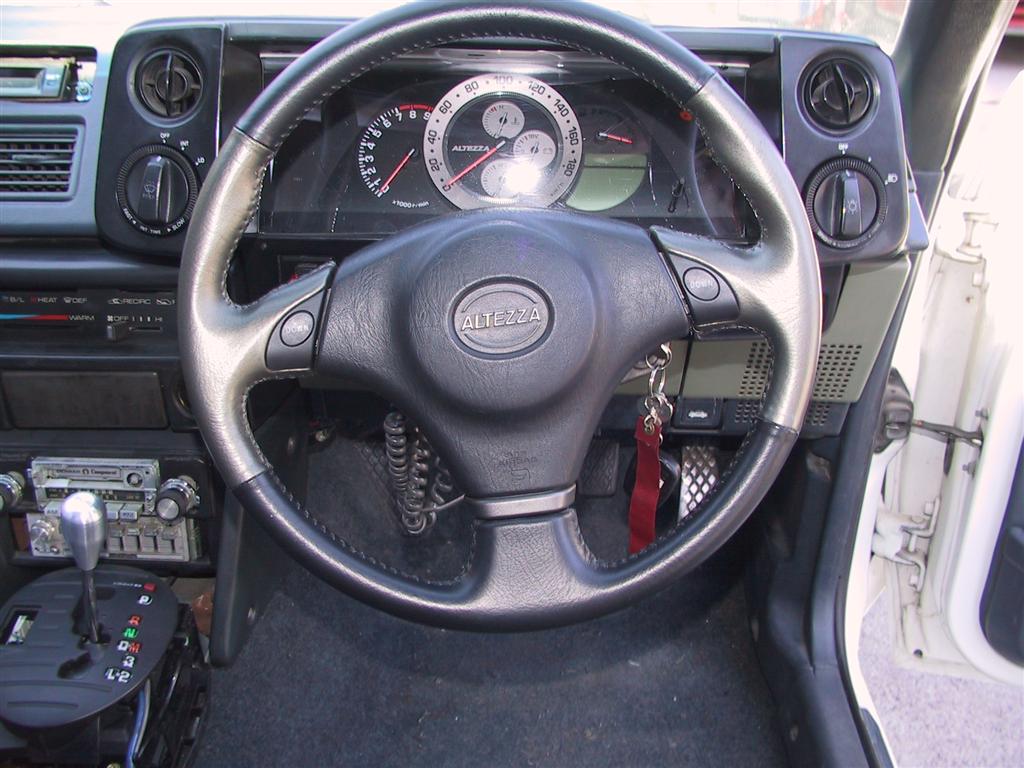 |
The
Altezza
instrument panel is also finally in place for good. There's still no
speedo at the moment, and the Altezza fuel gauge is not being used, in
favour of the AE-86 instead. (because of electrical compatibility
reasons) The gear change up/down buttons on the steering wheel also now
work, and it's fun to just hit a button to make all the changes when
driving around. Also to be done is a fabricated surround for the shifter, as neither of the factory ones fit at the moment. A fibreglass one will be made up at some point. |
November 2005
Ever since the 3SGE went in, it never ran properly. It's accelerate just fine, but cruising throttle would have the engine running roughly, as if the fuel mixture was very wrong. It'd also stall & die when slowing down so all in all not very pleasant to drive. I'd have to slow down by using the automatic gearbox in manual mode, going down through the gears to keep the revs up, and left-foot brake to keep the engine awake. So I really didn't do a lot with the car for many months ...
We narrowed down the problem to three possibilities - Fuel pressure, the two oxygen sensors in the wrong holes, and finally turbulent airflow over the hot-wire air flow meter in the inlet. After a lot of searching we finally found the right fuel pressure - 62psi - and we were very close to that anyway. I then went through the old build photos and found a couple that showed which oxygen sensor went in which hole - One sensor goes in the exhaust runners for cylinders #1 and #4, the other in the runners for #2 and #3. I thought that if we had those in the wrong way the computer would just keep trying to make the mixtures better, but in fact be making them worse. Initally I simply disconnected them to see if driving the car around made any difference, but it didn't so I had low hopes for this being the problem. The photos revealed that we did indeed have them the wrong way around, so after swapping them I hoped to see some sort of improvement. Well, unfortunately not!
That left just the inlet air flow ...
 |
Again, after a long
period of
little interest I finally got around to fiddling with the car. I reckoned the fastest way to check if the problem was the inlet air flow was to simply remove the air cleaner pod from the bottom of the inlet pipe and take the car for a drive. I did, and the car was barely driveable - Initally I was disappointed but I quickly realised that this was it! I had a quick look around for some metal mesh to straighten the airflow over the sensor, but couldn't find anything so I came up with the idea to superglue a bunch of drinking straws together to make a crude air flow straightening gadget. With a deep breath, I took the car for a drive ... AND IT DROVE PERFECTLY!!!!! I was running out of time before heading overseas to work again, so I just used more superglue to stick the straws together better and put some flyscreen over the top so any stray ones that got loose wouldn't go into the engine. Then taped the whole thing back into the inlet pipe and refitted the pod. It's only temporary, as I've found that the Mitsubishi Cordia's have the perfect mesh that I'm after and so when I can get a hold of that it'll be put in place permanently. The car is now fun to drive again, and so so will be out & about a lot more than it has been over the last year or so. |
 |
Things
to come:
-
Make the speedo work.
-
Fit the 4.1:1 diff ratio that the Altezza's have as standard so that
the speedo works accurately.
-
Fit the bigger brakes to the rear, to balance the large front brakes.
-
Finish off the interior panelling around the shifter.
To the mods done page
Back to the Index page
Page & contents where applicable © Bill Sherwood